Training for Model Developers

Click to start

Learning objectives

“As a developer who is new to ValidMind, I want to learn how to generate model documentation, add my own tests, edit the content, and then submit my documentation for approval.”

In this training module

PART 1

  • Initialize the developer framework
  • Start the model development process
  • Edit model documentation
  • Collaborate with others

PART 2

  • Implement custom tests and integrate external test providers
  • Finalize testing and documentation
  • View documentation activity
  • Submit for approval

First, let’s make sure you can log in and show you around.

Training is interactive —you explore ValidMind live. Try it!

, , SPACE , N — next slide     , , P , H — previous slide     ? — all keyboard shortcuts

Can you log in?

To try out this training module, you need to have been onboarded onto ValidMind Academy with the Developer role.


Log in to check your access:

Be sure to return to this page afterwards.

You’re in — let’s show you around.

This introductory notebook includes sample code and how-to information, all in one place.

When run on JupyterHub, this notebook will generate model documentation and upload it to ValidMind. After you finish this training module, your own training notebook will look similar, complete with output.

For now, scroll through this notebook to explore. When you are done, click to continue.

This is the ValidMind Platform UI.

From here, you can:

  • Register models in the model inventory.
  • Review and edit model documentation
    generated with the introductory notebook.
  • Collaborate with model validators to get
    your documentation approved.
  • And much more!

To start the documentation process, you register a
new model in the model inventory or select one that
has already been registered.

Explore ValidMind live on the next page.

From Model Inventory:

  1. Open a model, such as:

[Quickstart] Customer Churn Model

  1. Explore Documentation for
    model documentation.
  2. Check Getting Started for
    the code snippet.

Did you find the code snippet?
You will copy and paste a similar
snippet into your own notebook
later to upload documentation.

When you’re done, click to
continue.

PART 1

Initialize the ValidMind Developer Framework

On JupyterHub: Run the cells in 1. Initializing the ValidMind Developer Framework.

When you are done, return to this page and click to continue.

Start the model development process

On JupyterHub: Run the cells in 2. Start the model development process with raw data, run out-of-the box tests, and add evidence to model documentation.

When you reach Add individual test results to model documentation, return to this page and click to continue.

Edit model documentation

Now that you have generated documentation, edit it on ValidMind to add text or test-driven content blocks.

(Scroll down for the full instructions.)


Try it live on the next page.

Add a test-driven content block

Content blocks provide sections that are part of your model documentation — you can always add more, as required, and fill them with text or test results.

  1. Select a model by clicking on it or find your model by applying a filter or searching for it.

  2. In the left sidebar that appears for your model, click Documentation.

  3. Navigate to the 2.3. Correlations and Interactions section.

  4. Hover the cursor after the Pearson Correlation Matrix content block until a horizontal dashed line with a button appears that indicates you can insert a new block:

    Screenshot showing the insert button for test-driven blocks

    Screenshot showing the insert button for test-driven blocks
  5. Click and then select Test-Driven Block:

    • In the search bar, type in HighPearsonCorrelation.
    • Select HighPearsonCorrelation:balanced_raw_dataset as the test.

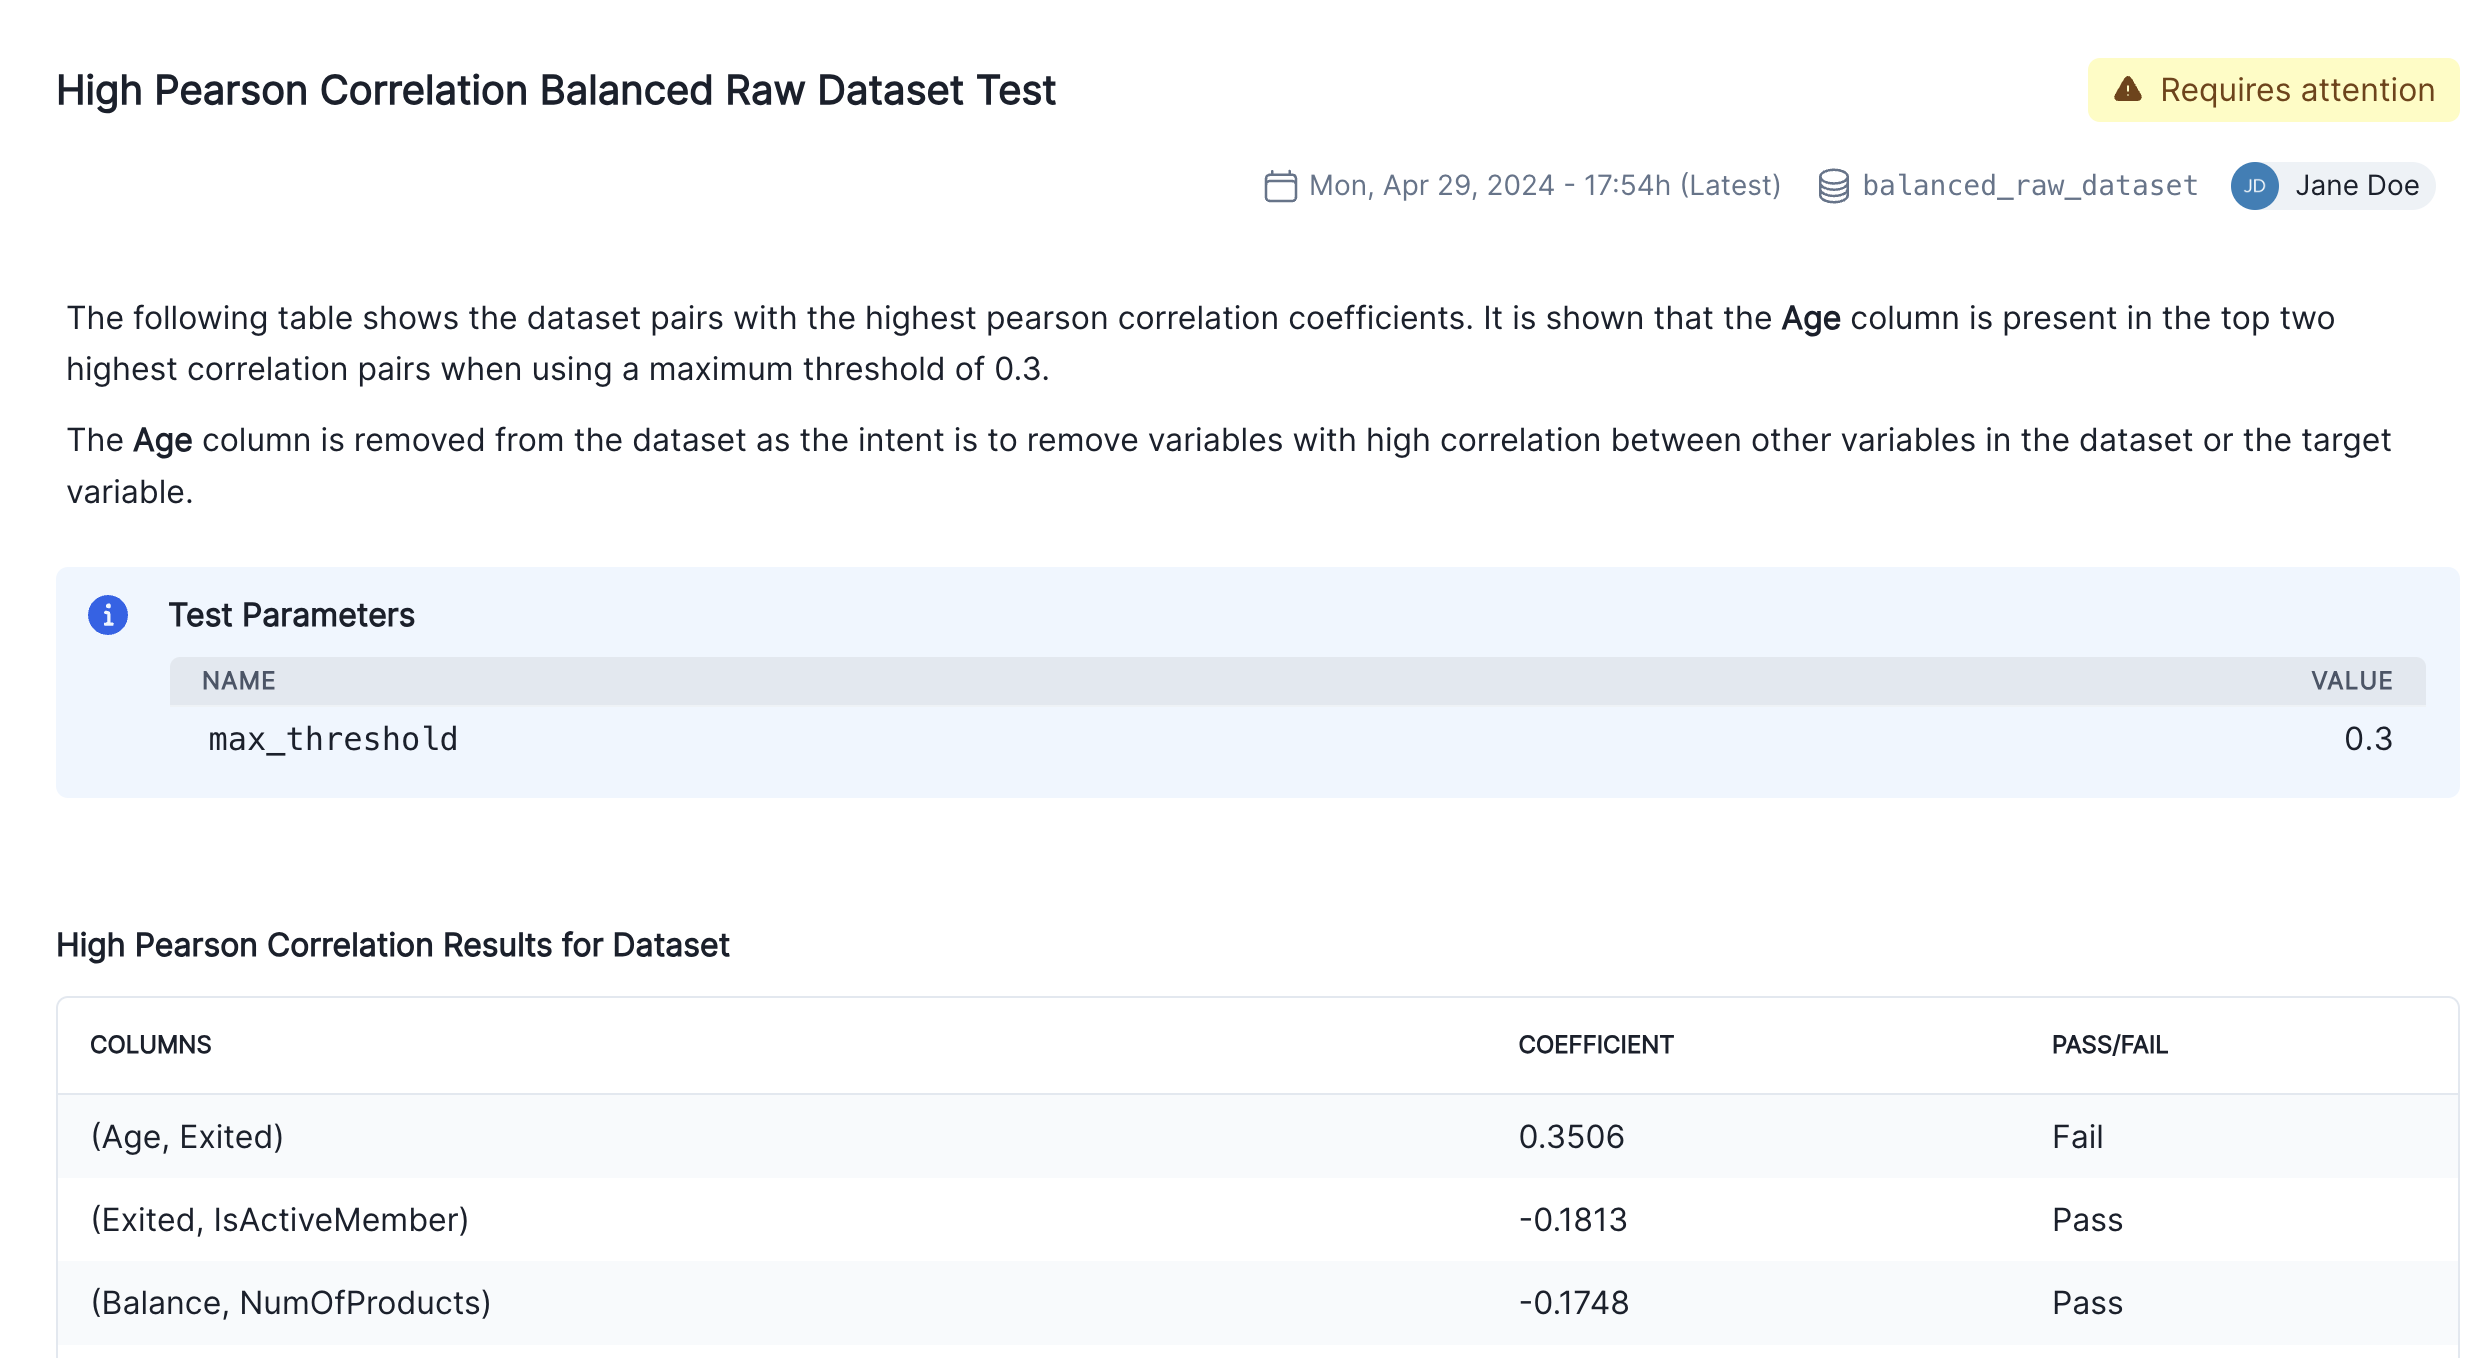
    A preview of the test gets shown:

    Screenshot showing the selected test result in the dialog

    Screenshot showing the selected test result in the dialog
  6. Click Insert 1 Test Result to Document.

After you have completed these steps, the new content block becomes a part of your model documentation. You will now see two individual results for the high-correlation test in the 2.3. Correlations and Interactions section of the documentation.

To finalize the documentation, you can also edit the description of the test result to explain the changes made to the raw data and the reasons behind them. For example:

Screenshot showing description added to the new content block

Screenshot showing description added to the new content block

Locate the model documentation you generated and add a test-driven block to the 3. Correlations and Interactions section.

When you are done, click to continue.

Collaborate with others

Have a question? Collaborate with other developers or with your validator right in the model documentation.

  1. In any section of the model documentation, select the portion of text you want to comment on, and click the Comment button in the toolbar.

  2. Enter your comment and click Comment.

  3. You can view the comment by clicking the highlighted text. Comments will also appear in the right sidebar.

  1. Click the highlighted text portion to view the comment thread.

  2. Enter your comment and click Reply.

  3. You can view the comment thread by clicking the highlighted text.

  1. Click the highlighted text portion to view the thread, then click to resolve the thread.

  2. To view the resolved comment thread, click the Comment archive button in the toolbar. You can view a history of all archived comments in the Comment archive.

  3. To reopen a comment thread, reply to the comment thread in the Comment archive or click the Reopen button that appears next to the highlighted text portion.


Try it live on the next page.

In the documentation, post a comment, reply to it, and then resolve the thread.
Review your comments in the Recent Activity feed on the front page.

When you are done, click to continue.

PART 2

Implement custom tests and integrate external test providers

On JupyterHub: Run the cells in 3. Implementing custom tests.

When you are done, return to this page and click to continue.

Finalize testing and documentation

On JupyterHub: Run the cells in 4. Finalize testing and documentation.

When you are done, return to this page and click to continue.

View documentation activity

Track changes and updates made to model documentation over time.

View documentation activity

  1. Select a model by clicking on it or find your model by applying a filter or searching for it.

  2. In the left sidebar that appears for your model, click Model Activity.

The table in this page shows a record of all activities, including:

  • Actions performed on the project by users in your organization
  • Project updates generated by the developer framework (API Client)


Try it live on the next page.

Review the Recent Activity feed on the front page:

  • Comments
  • Status updates
  • Project updates
  • Test results

When you are done, click to continue.

Submit for approval

When you’re ready, verify the approval workflow, and then submit your model documentation for approval.

(Scroll down for the full instructions.)


Try it live on the next page.

Workflow states and transitions are configured by an administrator in advance, but you should verify that the expected people are included in the approval process.

  1. Select a model by clicking on it or find your model by applying a filter or searching for it.

  2. On the landing page of your model, locate the model status section:

    • Click See Workflow to open the detailed workflow associated with that model.
    • The current workflow state will be highlighted on this detail view.

While your lifecycle statuses and workflows are custom to your organization, some examples are:

  • In Documentation — The model is currently being documented and can be submitted for validation next.
  • In Validation — The model is currently being validated and can be submitted for review and then approval.

To transition through the approval workflow, all required workflow steps must be completed. By default, a model must be in the In Documentation state before you can submit it for validation.

  1. Select a model by clicking on it or find your model by applying a filter or searching for it.

  2. If an action is available to your role, you’ll see it listed under your model status on the model’s landing page.

    • Click to open up the transition panel for your selected action. This arrow will be followed by the action name.
    • Enter your Notes then click Submit.

While your lifecycle statuses and workflows are custom to your organization, some examples are:

  • To submit model documentation for validation — Click Ready for Validation to indicate that a model developer has completed the initial model documentation and is ready to have it validated. Add any notes that need to be included and then click Ready for Validation.
  • To submit validation reports for review and approval — Click Ready for Review to indicate that you have completed your initial model validation report, fill in the mandatory notes, and submit.
  • To request revisions to model documentation or validation reports — Click Request Revision, fill in the mandatory notes to explain the changes that are required, and submit.
  • To have your model documentation and validation report approved — Click Ready for Approval, fill in the mandatory notes, and submit.

Verify the approval workflow and then submit your model documentation for approval.

When you are done, click to continue.

About model documentation

There is more that ValidMind can do to help you create model documentation, from using your own template to code samples you can adapt for your own use case.

Or, find your next learning resource on ValidMind Academy.